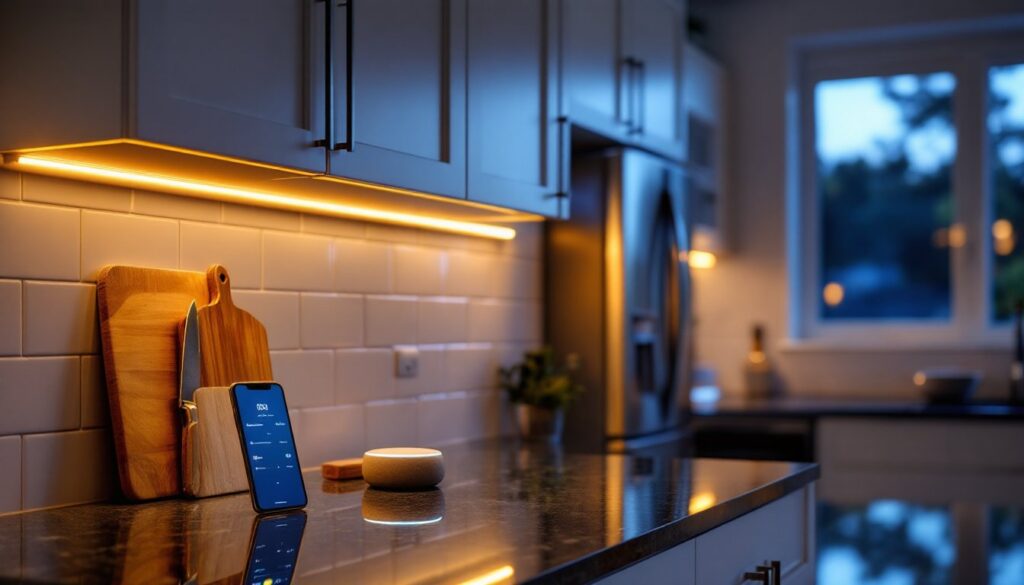
Under cabinet lighting has gone from a builder-grade afterthought to one of the smartest upgrades a homeowner can make. Voice control, dimming schedules, and color-changing LEDs mean these lights now do far more than illuminate countertops. They integrate into whole-home automation, sync with other devices, and adapt to how a kitchen is actually used. For anyone who’s ever fumbled for a light switch with wet hands or wanted task lighting that doesn’t wake the whole house at 6 a.m., smart under cabinet lighting solves real problems.
Table of Contents
ToggleKey Takeaways
- Smart under cabinet lighting connects via Wi-Fi, Bluetooth, or proprietary hubs to enable voice control, automation schedules, and seamless integration with Alexa, Google Assistant, and Apple HomeKit.
- LED strip lights, puck lights, and light bars each offer distinct advantages—strips provide continuous illumination, pucks highlight specific zones, and light bars deliver consistent brightness with minimal installation effort.
- Task lighting precision and energy efficiency are the primary benefits, with LED systems consuming a fraction of the power of traditional halogen fixtures while allowing users to adjust color temperature from cool whites (4000K–5000K) for cooking to warm tones (2700K–3000K) for ambiance.
- Matter protocol support is now the industry standard for smart under cabinet lighting, ensuring future-proof compatibility across multiple brands and platforms without requiring proprietary hubs.
- Installation requires measuring cabinet runs, preparing surfaces with isopropyl alcohol, securing low-voltage connections with correct polarity, and pairing devices via the companion app—while hardwired systems may require a licensed electrician to comply with NEC guidelines.
- Adaptive lighting, motion sensors, grouped scenes, and energy monitoring are essential 2026 features that enhance convenience, support circadian rhythms, and help homeowners optimize whole-home energy budgets.
What Is Smart Under Cabinet Lighting?
Smart under cabinet lighting refers to LED fixtures installed beneath wall cabinets that connect to a home network via Wi-Fi, Bluetooth, or a proprietary hub like Zigbee or Z-Wave. Unlike traditional plug-in or hardwired lights controlled by a wall switch, these systems respond to voice commands, smartphone apps, motion sensors, and programmed schedules.
The defining feature is network connectivity. Most systems work with Alexa, Google Assistant, or Apple HomeKit, allowing users to say “dim the kitchen lights to 30%” or “turn on the prep lights” without touching a switch. Many models also support automation routines, lights can turn on at sunset, brighten when a motion sensor detects movement, or shift to warmer tones in the evening.
From a technical standpoint, these fixtures use low-voltage DC power (typically 12V or 24V) supplied by a driver or transformer. Some strip lights and puck lights come with adhesive backing for tool-free installation, while hardwired light bars may require basic electrical work and, depending on jurisdiction, a permit if they’re tied into household circuits. Either way, the brain of the system is the controller or hub that bridges the lights to the home network.
Key Benefits of Installing Smart Under Cabinet Lights
Task lighting precision is the most immediate benefit. Countertop work, chopping, reading recipes, inspecting cookware, demands focused light. Smart systems let users dial in the exact brightness and color temperature (measured in Kelvin) to suit the task. Cooler whites (4000K–5000K) work well for food prep, while warmer tones (2700K–3000K) create ambiance during dinner.
Energy efficiency is another draw. LED strips and puck lights consume a fraction of the power that halogen or xenon fixtures use. A typical 10-foot LED strip pulls around 24 watts, compared to 120+ watts for older systems. Dimming and scheduling features cut energy use further, lights only run when needed, and at the intensity required.
Integration with smart home automation routines elevates convenience. Lights can trigger when a door opens, sync with a morning coffee timer, or gradually brighten as an alarm goes off. For homes already running smart thermostats, locks, or cameras, under cabinet lights become another controllable layer.
Finally, safety and accessibility matter. Motion-activated lighting helps anyone moving through a dark kitchen at night, and voice control assists users with mobility challenges. No fumbling for switches, no tripping over pets or clutter in low light.
Types of Smart Under Cabinet Lighting Systems
Choosing the right form factor depends on cabinet layout, desired light distribution, and how visible the homeowner wants the fixture to be. Each type has trade-offs in coverage, installation complexity, and aesthetics.
LED Strip Lights vs. Puck Lights vs. Light Bars
LED strip lights are flexible ribbons of LEDs, typically sold in 16-foot or 32-foot reels that can be cut to length at designated intervals (usually every few inches). They’re ideal for continuous, uniform illumination along the cabinet run. Most smart strips use 3M-style adhesive backing and connect to a controller via a low-voltage wire. Because they’re thin (often under ¼ inch), they tuck neatly against the cabinet underside and stay invisible from most angles. Coverage is even, but brightness can vary by LED density (measured in LEDs per foot). Look for strips rated at least 300 LEDs per 16 feet for solid task lighting.
Puck lights are small, disc-shaped fixtures, usually 2.5 to 3 inches in diameter, that mount individually under cabinets. They create pools of light rather than a continuous wash, which works well for highlighting specific zones like a coffee station or cutting board area. Smart puck lights often daisy-chain together with low-voltage connectors, so one driver can power multiple units. Installation is straightforward (peel-and-stick or screw-mount), but achieving even coverage requires careful spacing. Experts typically recommend placing pucks 8 to 12 inches apart to avoid dark gaps.
Light bars are rigid, linear fixtures that range from 12 to 48 inches in length. They’re brighter per unit than pucks and neater than strip lights, with built-in diffusers that eliminate LED hotspots. Many light bars link end-to-end with snap connectors, making them modular. Hardwired models often integrate directly into household wiring and may require a licensed electrician if the installation involves new junction boxes or circuit extensions. For renters or anyone avoiding electrical work, plug-in light bars with smart plugs offer a compromise, though the visible cord can be a drawback.
Each type integrates with the same smart ecosystems, so the decision comes down to aesthetics, budget, and how permanent the installation needs to be.
How to Choose the Right Smart Under Cabinet Lighting
Start by measuring the cabinet run length and noting any breaks for the range, sink, or open shelving. This determines how many feet of strip, how many pucks, or how many light bars are needed. Don’t forget to account for corners, most strip lights require special connectors or soldering for 90-degree turns, while light bars and pucks handle corners more easily.
Next, consider power source and installation method. Plug-in kits are the simplest: a transformer plugs into an outlet, and low-voltage wire runs to the lights. No electrical permit, no wall cutting. Hardwired systems look cleaner (no visible cords), but they often require opening up walls to run Romex or adding a junction box, which may trigger NEC Article 410 requirements and local permitting. If in doubt, consult a licensed electrician.
Brightness and color temperature matter for usability. Look for fixtures rated at least 300 to 400 lumens per foot for adequate task lighting. Adjustable color temperature (often labeled as tunable white or CCT) is a valuable feature, it lets users shift from cool white for cooking to warm white for entertaining. RGB color-changing lights are fun for ambiance but less practical for everyday tasks.
Compatibility is critical. Verify the system works with the existing smart home platform, Alexa, Google Home, HomeKit, or Samsung SmartThings. Some lights require a separate hub (like Philips Hue Bridge or a Zigbee controller), while others connect directly via Wi-Fi or Bluetooth. Wi-Fi models are convenient but can tax router bandwidth: Zigbee and Z-Wave create mesh networks that improve reliability.
Finally, check dimming range and control granularity. Cheap dimmers may flicker at low levels or jump in coarse steps. Quality smart lights dim smoothly from 1% to 100%, which makes a big difference for mood lighting or late-night snacking. Many kitchen lighting setups benefit from this flexibility.
Installation Guide: Setting Up Your Smart Lights
Before touching anything, turn off power at the breaker if working with hardwired fixtures. Even low-voltage systems deserve caution, verify with a non-contact voltage tester.
Step 1: Clean and prep surfaces. Wipe cabinet undersides with isopropyl alcohol or a degreaser to remove dust and cooking residue. Adhesive backing won’t stick to grime, and poor adhesion leads to sagging lights.
Step 2: Dry-fit the layout. Unroll strips or position pucks/light bars without removing adhesive backing. Mark placement with painter’s tape. For strips, plan where to make cuts (only at designated cut lines, usually marked with scissor icons). For pucks, aim for even spacing. For light bars, ensure connectors align and cords reach the driver.
Step 3: Mount the lights. Peel backing and press firmly, holding each section for 10–15 seconds. For screw-mount pucks or light bars, pre-drill pilot holes to avoid splitting cabinet material. Use #6 x ½-inch screws for plywood or MDF cabinets.
Step 4: Wire the system. Connect low-voltage leads to the driver or controller per manufacturer diagrams. Polarity matters, red to positive, black to negative. Use wire nuts or push connectors rated for low-voltage DC. Tuck excess wire behind the driver or inside a cabinet. If hardwiring into household circuits, follow NEC guidelines: use a junction box, secure Romex with clamps, and ensure the driver is rated for the circuit amperage.
Step 5: Pair with the smart hub or app. Plug in the driver, open the companion app, and follow pairing instructions. Most systems enter pairing mode automatically on first power-up. Add the lights to voice assistants and test dimming, color changes, and schedules.
Safety note: Always wear safety glasses when drilling overhead, and keep a fire extinguisher nearby if soldering connections. If the project involves running new circuits or adding outlets, hire a licensed electrician, DIY electrical work that violates code can void homeowner’s insurance.
For renters or anyone wanting a temporary setup, consider routing wires along cabinet edges with adhesive cable clips, then painting them to match. It’s not invisible, but it avoids permanent modifications.
Top Smart Features to Look For in 2026
Matter protocol support is the new standard. Launched in late 2022 and gaining traction through 2025, Matter is a universal smart home language that lets devices from different brands work together without proprietary hubs. Lights with Matter certification can be controlled by Alexa, Google, and Apple simultaneously, and they’re more future-proof as the ecosystem expands. According to Digital Trends, Matter adoption has accelerated among lighting manufacturers in 2026.
Adaptive lighting adjusts color temperature automatically throughout the day to match circadian rhythms. Lights start cool and bright in the morning, shift to neutral midday, and warm up in the evening. It’s subtle but effective for maintaining energy levels and sleep quality. Apple HomeKit introduced this feature a few years ago, and now many third-party systems include it.
Motion and occupancy sensors built into or paired with under cabinet lights add hands-free convenience. Walk into the kitchen at 3 a.m., and lights gently fade on at 10% brightness, then turn off after a set period of inactivity. Tom’s Guide highlights this as a must-have feature for modern smart lighting setups.
Grouped scenes and zones let users control multiple light sets with a single command. “Kitchen prep” might turn on under cabinet lights at 100% cool white, while “dinner mode” dims them to 40% warm white and activates pendant lights over the island. Scenes sync across platforms, so routines built in one app work in another.
Energy monitoring is appearing in higher-end systems. The app tracks cumulative runtime and power draw, helping users quantify savings and identify fixtures that may be failing. It’s a small feature, but useful for anyone optimizing a whole-home energy budget.
Finally, backup battery options are rare but valuable. Some wireless puck lights include rechargeable batteries that keep them running during power outages, handy for storm-prone regions. Most hardwired systems don’t offer this, so consider adding battery-powered motion lights as a supplement for true emergency lighting.
When planning a lighting upgrade, think beyond the cabinets. Coordinating under cabinet lights with task lighting at the sink and ambient pantry lighting creates a cohesive, layered design that elevates the entire kitchen. Smart controls tie it all together, turning separate fixtures into a unified system that adapts to daily life.