When it comes to outdoor lighting that lasts through seasons and delivers both function and curb appeal, Hinkley has been a go-to name for decades. Whether you’re lighting a pathway, highlighting architectural features, or creating ambiance around a patio, the brand offers a wide range of fixtures built to handle weather and wear. This guide walks through what sets Hinkley apart, which collections fit different design goals, how to choose fixtures for specific areas, and practical tips for installation and upkeep, no fluff, just what DIYers need to get it right.
Table of Contents
ToggleKey Takeaways
- Hinkley landscape lighting combines decades of engineering expertise with weather-resistant materials like solid brass and marine-grade aluminum to deliver outdoor fixtures that last 10-plus years without constant refinishing.
- Low-voltage 12V systems and LED-compatible fixtures make Hinkley landscape lighting a DIY-friendly option that reduces shock risk, simplifies installation, and cuts energy costs compared to line-voltage alternatives.
- Choosing fixtures by functional zone—pathways, accent lighting, and hardscape—with proper spacing and wattage prevents over-lighting and ensures balanced illumination across your entire outdoor landscape.
- Proper installation requires correct wire gauges (12-gauge for long runs), waterproof connectors, voltage verification within 10% of transformer output, and trenching at least 6 inches deep to protect cable integrity.
- Seasonal maintenance including spring lens cleaning, summer connection inspections, fall photocell testing, and annual wax application on brass or bronze finishes preserves light output and extends fixture lifespan significantly.
What Makes Hinkley Landscape Lighting Stand Out
Hinkley has been manufacturing lighting fixtures since 1922, which means they’ve had plenty of time to refine materials, finishes, and durability standards. Their landscape lighting lineup isn’t just about aesthetics, it’s engineered to resist corrosion, UV damage, and moisture intrusion in ways that cheaper knock-offs can’t match.
Most Hinkley outdoor fixtures carry a solid brass or marine-grade aluminum construction, both of which hold up well in coastal, humid, or freeze-thaw climates. The brand applies multi-step finishing processes, powder coating, electroplating, and clear coats, that protect against salt spray, oxidation, and fading. This matters if you’re planning a system that’ll stay put for 10-plus years without constant refinishing.
From a practical standpoint, Hinkley fixtures are widely compatible with low-voltage (12V) systems, which most DIYers can install without an electrician. Low-voltage setups reduce shock risk and allow for simpler wire runs compared to 120V line-voltage systems. Many Hinkley fixtures also accept LED bulbs or integrated LED modules, cutting energy use and bulb replacements down significantly. Some collections offer integrated drivers that simplify transformer matching and reduce voltage drop over long runs.
Another advantage: Hinkley provides photometric data and beam-angle specs for most fixtures, so you’re not guessing about light spread or intensity. If you’re planning a layout, knowing that a path light delivers a 30-degree beam at 200 lumens helps you space fixtures correctly from the start.
Popular Hinkley Landscape Lighting Styles and Collections
Hinkley groups its landscape fixtures into collections that share design language and finish options. Picking a collection upfront keeps the look cohesive across path lights, well lights, and wall mounts.
Modern and Contemporary Fixtures
For clean lines and minimal ornamentation, the Hardy Island, Nuvi, and Atlantis collections lead the pack. Hardy Island features geometric housing in finishes like Satin Bronze and Titanium, with both square and cylindrical silhouettes. These work well flanking modern entries or lining minimalist garden beds.
The Nuvi series leans heavier into architectural LED strips and low-profile bollards. Fixtures use die-cast aluminum bodies and frosted acrylic lenses to diffuse light evenly, avoiding harsh hot spots on walkways. Atlantis, originally designed for marine environments, brings a sleek nautical vibe, think flush-mount deck lights and surface-mount step lights in Bronze or Stainless Steel. All three collections integrate LED modules, so no bulb hunting later.
Traditional and Classic Designs
If the home has Colonial, Craftsman, or Mediterranean bones, collections like Anchorage, Lucerne, and Bolla provide period-appropriate options. Anchorage uses seedy glass (textured, not smooth) in lantern-style housings, echoing early 20th-century fixtures. It’s a solid match for homes with outdoor lighting sconces already installed in traditional finishes.
Lucerne offers a more European aesthetic, curved arms, clear glass panels, and decorative scrollwork in Copper Bronze or Regency Bronze. These fixtures add formality to driveways or courtyards. Bolla, with its spherical opal glass shades, bridges traditional and transitional styles. The rounded forms soften straight architecture without looking dated, and the glass diffuses light gently, reducing glare on pathways.
Most traditional Hinkley fixtures accommodate E26 medium-base bulbs, so retrofitting with LED replacements is straightforward. Check the IP (Ingress Protection) rating, look for IP65 or higher if the fixture will face direct rain or snow.
Choosing the Right Hinkley Fixtures for Your Outdoor Areas
Matching fixture type to function prevents over-lighting some areas and under-lighting others. Start by mapping your property into zones: pathways, architectural features, plantings, and task areas (decks, patios, entry steps).
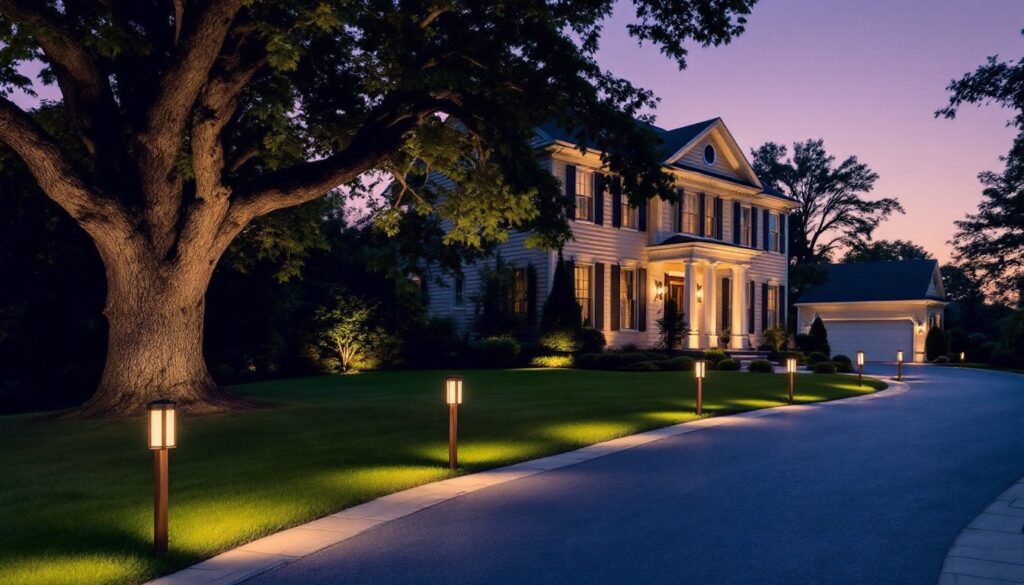
For pathways, bollard lights or low-profile path lights spaced 8 to 10 feet apart provide even coverage without blinding walkers. Hinkley’s path lights typically sit 18 to 24 inches tall and cast pools of light downward. If the path curves, stagger fixtures on alternating sides to guide the eye naturally. For driveways or wider walks, consider using low voltage pathway lighting setups that allow flexible spacing and easy repositioning.
To highlight trees, columns, or façade details, use well lights or bullet-style spotlights. Well lights install flush with grade and direct beams upward, ideal for tree trunks or architectural corners. Bullet spots mount on stakes or surface plates and offer adjustable angles, useful for lighting focal points from a distance. Aim for 3 to 5 watts per fixture for accent work: higher wattages wash out details rather than emphasizing them.
For decks, patios, and outdoor kitchens, hardscape lights (step lights, post-cap lights, or recessed deck lights) provide task lighting without occupying floor space. Hinkley’s step lights often come in 3-inch square or round formats that fit standard stair risers. Post-cap lights, which sit atop 4×4 or 6×6 posts, spread ambient light across seating areas, a good complement to exterior spot lighting used for safety.
Don’t forget about zone control. Running separate home runs (wire branches) back to the transformer for each area lets you dim or switch zones independently. A 300-watt transformer can typically handle 20 to 25 small path lights or 6 to 8 larger spotlights, depending on wattage.
Installation Tips for Hinkley Landscape Lighting Systems
Most Hinkley landscape fixtures run on 12V AC systems, which don’t require a licensed electrician in many jurisdictions, but always check local codes. You’ll still need a GFCI-protected 120V outlet to power the transformer, and that outlet should be on a dedicated circuit if you’re running a large system.
Start by laying out fixtures during the day, using stakes or flags to mark positions. Walk the route at dusk to confirm sightlines and spacing. Once the layout is set, trench for wire. 14-gauge or 12-gauge direct-burial cable is standard: 12-gauge handles longer runs (up to 100 feet from the transformer) with less voltage drop. Bury cable 6 inches deep minimum, deeper if local frost lines demand it or if the run crosses high-traffic areas.
When connecting fixtures, use waterproof wire connectors (silicone-filled or heat-shrink types) rather than twist-on caps. Strip wire carefully, too much exposed copper invites corrosion. Most Hinkley fixtures include quick-connect leads that simplify splicing, but double-check polarity if you’re mixing brands or older fixtures.
Mount the transformer near the power source, ideally on an exterior wall or post at least 12 inches off the ground. Transformers with built-in timers or photocells automate on/off cycles, but programmable models let you set multiple scenes, useful if you want path lights on all night and accent lights off after midnight. Consider multi-tap transformers with 12V, 13V, 14V, and 15V outputs: tapping higher voltages on long runs compensates for voltage drop.
After wiring, test each zone before backfilling trenches. Use a multimeter to verify voltage at the farthest fixture, it should read within 10% of the transformer’s output (10.8V to 13.2V on a 12V system). If readings are low, upsize wire or shorten the run.
Safety note: Always wear work gloves and eye protection when cutting wire or driving stakes. If you hit a sprinkler line or utility, shut off water or power immediately and call for repairs. Most utilities offer free locate services, use them before you dig.
Maintenance and Care for Long-Lasting Performance
Hinkley fixtures are built to last, but outdoor conditions test everything. A seasonal maintenance routine keeps lights bright and prevents expensive replacements.
Spring: Clear debris from lenses and housings. Leaves, pollen, and dirt reduce light output by 20% or more. Use a soft cloth and mild soapy water, avoid abrasive cleaners that scratch finishes or lenses. Check mounting stakes for looseness: freeze-thaw cycles can shift fixtures. Re-stake or add gravel around bases if needed.
Summer: Inspect wiring connections, especially if you’ve had heavy rain or flooding. Corroded connectors show green or white buildup: replace them with fresh waterproof connectors. Trim back vegetation that’s grown over fixtures, overgrown plants block light and trap moisture against housings, accelerating corrosion.
Fall: Test the transformer timer or photocell. As daylight hours change, older mechanical timers drift. Replace batteries in timers that use them, or upgrade to a digital model for better accuracy. Walk the system at night to spot dead bulbs or dimming LEDs. LED modules typically last 25,000 to 50,000 hours, but early failures happen, most Hinkley fixtures carry a warranty that covers defects for 1 to 3 years, depending on the collection.
Winter: In freeze-prone areas, ensure fixtures have proper drainage. Some well lights include weep holes: keep them clear so water doesn’t freeze inside the housing and crack the lens. If you’re in a region with heavy snow, mark fixture locations with stakes so snow removal doesn’t damage them.
Finishes benefit from an annual wax or sealant application. Use a carnauba-based paste wax on brass or bronze fixtures to preserve patina and slow oxidation. Stainless steel and aluminum need less attention but can develop water spots in hard-water areas: wipe them down with a vinegar solution and rinse.
If light output drops across the whole system, measure voltage at the transformer and at distant fixtures. A reading below 10.5V under load signals either an undersized transformer or excessive wire resistance. Upgrading to thicker wire or splitting the system into two runs often solves the issue.
Keep a log of bulb replacements and fixture adjustments. Patterns, like one zone dimming faster than others, point to wiring problems or a failing transformer tap. Catching these early saves both time and fixtures.