Stumbling down a dark stairway is one of the quickest ways to ruin an evening, and one of the most preventable. Outdoor step lighting isn’t just decorative window dressing: it’s a critical safety feature that reduces fall risk while adding architectural interest to decks, porches, and pathways. Whether you’re working with concrete steps, composite decking, or stone risers, the right lighting setup transforms a potential hazard into a welcoming entrance. This guide covers fixture types, installation approaches, and design strategies that balance code compliance with curb appeal.
Table of Contents
ToggleKey Takeaways
- Outdoor step lighting is a critical safety feature that reduces fall risk—falls account for over 8 million emergency room visits annually—while adding architectural value and extending usable outdoor hours.
- Solar-powered step lights offer the easiest installation with zero wiring but deliver limited brightness (5–15 lumens) and require at least 6 hours of daily sunlight, making low-voltage LED systems the preferred workhorse option for permanent setups.
- Low-voltage LED step lights consume minimal power (1–3 watts per fixture) and last 25,000–50,000 hours, allowing a single 60-watt transformer to power 20–40 fixtures for scalable, reliable installations.
- Successful step lighting design targets 10–30 lumens per step with fixtures spaced every 2–4 steps, maintains consistent color temperature (3000K warm white or 4000K–5000K cool white), and prioritizes IP65-rated weatherproof housings.
- DIY installation requires parallel wiring, weatherproof connectors, and careful cable routing, but most failures stem from transformer overload, inadequate sealing, or incorrect voltage calculations.
- Layered lighting that combines step lights with wall sconces and accent lighting creates depth and prevents the unflattering ‘runway effect,’ while indirect illumination and material-appropriate fixtures enhance both safety and curb appeal.
Why Outdoor Step Lighting Matters for Your Home
Safety is the most compelling reason to light outdoor steps. According to the National Safety Council, falls account for over 8 million emergency room visits annually in the U.S., with stairs and steps contributing significantly to that figure. Poor visibility magnifies the risk, especially during wet or icy conditions.
Most building codes don’t mandate step lighting for single-family residences the way they do for commercial buildings, but the International Residential Code (IRC) does require adequate illumination for stairways inside the home. Applying the same logic outdoors, particularly for steps near entry doors, is smart risk management. Insurance adjusters notice these details during liability claims.
Beyond safety, step lighting adds property value. Well-lit stairs signal attention to detail and make evening arrivals feel secure. For homes with tiered landscaping or multi-level decks, lighting turns architectural features into focal points rather than obstacles. It’s the difference between guests squinting at their feet and confidently navigating your outdoor space.
Step lights also extend usable hours for outdoor living. A well-lit deck stairway means evening barbecues don’t end at dusk, and morning coffee on the porch doesn’t require a flashlight. If your property includes a pool, spa, or fire pit accessible by steps, lighting becomes essential for both safety and ambiance.
Types of Outdoor Step Lighting to Consider
Solar-Powered Step Lights
Solar step lights are the simplest install, no wiring, no transformer, no electrician. Each fixture contains a small photovoltaic panel, rechargeable battery, and LED. They charge during the day and turn on automatically at dusk.
The upside: installation takes minutes with screws or adhesive. They’re ideal for rental properties, seasonal cabins, or anywhere running wire is impractical. Newer models from reputable manufacturers deliver 8–10 hours of runtime after a full charge.
The downside: output is limited, most solar step lights produce 5–15 lumens, enough for basic visibility but not dramatic illumination. Battery life degrades after 2–3 years, and shaded areas won’t charge effectively. Cold climates reduce performance in winter. If your steps get less than 6 hours of direct sun daily, solar may disappoint.
Tip: Choose fixtures with replaceable batteries (usually AA NiMH or 18650 lithium) rather than sealed units. That extends lifespan and reduces waste.
Low-Voltage and LED Step Lights
Low-voltage systems run on 12V DC power supplied by a transformer that steps down standard 120V household current. This is the workhorse option for permanent outdoor lighting and pairs well with broader landscape plans like low voltage pathway lighting.
LED step lights dominate the low-voltage market for good reason: they sip power (typically 1–3 watts per fixture), last 25,000–50,000 hours, and produce minimal heat. A standard 60-watt transformer can power 20–40 step lights depending on wattage, making them scalable for large installations.
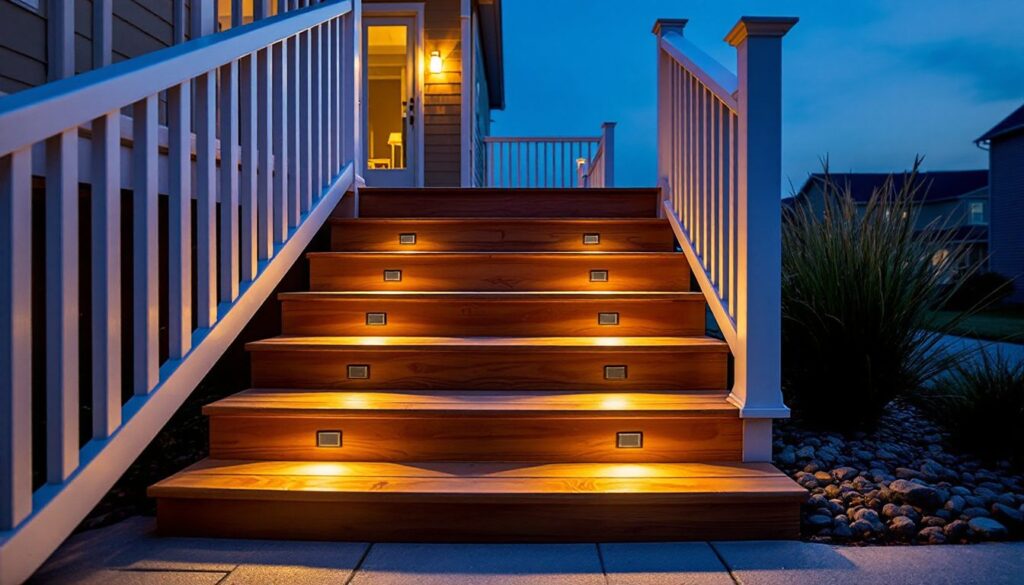
Fixture styles vary widely. Recessed lights mount flush with stair risers or treads, protecting the fixture from foot traffic and lawn equipment. They require drilling a hole (usually 2–3 inches diameter) and may need a weatherproof junction box. Surface-mount lights attach directly to wood, composite, or masonry with screws, making them faster to install but slightly more exposed.
For composite or wood decking, deck rail lights that mount to post caps or underside joists offer indirect illumination without drilling into treads. Metal or masonry stairs often use recessed wall lights installed in adjacent walls or risers.
Color temperature matters. 3000K warm white blends with incandescent porch lights and creates a welcoming glow. 4000K–5000K cool white offers better visibility and works for modern or commercial aesthetics. Avoid RGB color-changing lights unless you’re intentionally going for a nightclub vibe, they rarely age well in residential settings.
If existing wiring is present, line-voltage (120V) step lights are an option, but they require GFCI protection, weatherproof boxes, and ideally a licensed electrician. Most DIYers stick with low-voltage for flexibility and safety.
How to Choose the Right Step Lighting for Your Outdoor Space
Start by counting steps and measuring riser height and tread depth. Standard outdoor steps follow IRC guidelines: risers between 4 and 8 inches, treads at least 10 inches deep. Uneven or non-compliant stairs pose safety issues that lighting can’t fix, address those first.
For material compatibility, check what you’re mounting to. Composite decking (Trex, TimberTech) accepts screws but may require pre-drilling to avoid cracking. Concrete and stone need masonry bits and anchors. Pressure-treated lumber is straightforward but confirm fastener compatibility (stainless steel or coated screws resist corrosion).
Lumens and spacing are more art than science. For basic visibility, aim for 10–30 lumens per step. Brighter isn’t always better, glare can reduce visibility and annoy neighbors. Space fixtures every 2–4 steps depending on output, or install one per step for uniform coverage. Many homeowners alternate sides for a staggered pattern that reduces dark spots without overdoing it.
Consider your power source. If you’re adding step lights to existing DIY landscape lighting, tap into that transformer, just confirm total wattage stays below the transformer’s capacity (typically 80% of rated output for longevity). If starting from scratch, size the transformer to accommodate future expansion. A 300-watt transformer offers plenty of headroom for 50+ feet of lighting.
Weather resistance is non-negotiable. Look for fixtures rated IP65 or higher (dust-tight and protected against water jets). Coastal areas need corrosion-resistant housings (aluminum, stainless steel, or marine-grade composite). Freezing climates demand fixtures that won’t crack when moisture expands.
Don’t overlook control options. Basic systems use a photocell or timer built into the transformer. Smarter setups integrate with home automation platforms (Z-Wave, Zigbee, Wi-Fi) for scheduling, dimming, and remote control. If you’re investing in permanent fixtures, spend the extra $30–$50 for a programmable controller, it’s worth it.
Installing Outdoor Step Lights: A DIY-Friendly Approach
Safety first: If you’re working near existing electrical lines or unsure about any step, hire a licensed electrician. Low-voltage work is generally safe for DIYers, but 120V line-voltage installations require permits and inspections in most jurisdictions.
Tools and materials:
- Cordless drill with twist bits and hole saw (for recessed lights)
- Wire strippers and crimpers
- Weatherproof wire connectors (not wire nuts, use heat-shrink or silicone-filled connectors)
- 14- or 16-gauge low-voltage cable (bury-rated if running underground)
- Step lights and transformer
- Mounting screws (stainless or coated)
- Silicone sealant or caulk (outdoor-rated)
- PPE: safety glasses, work gloves, ear protection (if drilling masonry)
Step-by-step installation:
-
Plan the layout. Mark fixture locations with painter’s tape. Measure wire runs to ensure cable reaches from the transformer to the farthest light. Low-voltage systems tolerate some voltage drop, but runs over 100 feet may need heavier gauge wire or a second transformer.
-
Mount the transformer near a GFCI-protected outlet, ideally under an eave or in a weatherproof enclosure. Keep it accessible for troubleshooting. The transformer’s timer or photocell should face away from direct light sources that might confuse the sensor.
-
Drill mounting holes for recessed fixtures. Use a spade bit or hole saw sized to the fixture housing (usually 2–3 inches). For masonry, use a carbide-tipped masonry bit and drill slowly to avoid cracking. Test-fit each fixture before running wire.
-
Run cable along the least visible route, under deck joists, behind risers, or buried in a shallow trench (check local code for depth requirements: typically 6–12 inches for low-voltage). Secure cable with insulated staples every 12–18 inches, keeping it away from edges where mowers or trimmers might snag it.
-
Wire fixtures in parallel, not series. Each light connects to the main cable run with a T-tap connector or pigtail splice. Series wiring (daisy-chaining) causes lights farther from the transformer to dim. Strip wire carefully, nick the insulation, not the copper strands.
-
Seal penetrations. After mounting each fixture, apply a bead of silicone caulk around the housing to prevent water intrusion. For wood and composite, this step prevents rot and extends material life.
-
Test the system before backfilling trenches or finishing trim. Plug in the transformer, override the timer if needed, and confirm each light illuminates. Troubleshoot any dark spots, loose connections are the usual culprit.
-
Adjust aim on directional fixtures. Most step lights have a small range of tilt. Aim for even coverage without spilling light into neighbors’ windows or creating glare.
Common mistakes to avoid:
- Overloading the transformer. Calculate total wattage before adding fixtures.
- Using indoor-rated wire connectors. Moisture causes corrosion and failure.
- Skipping test-fits. Drilling the wrong size hole in concrete is expensive to fix.
- Ignoring voltage drop. If lights at the end of a run seem dim, you may need a second transformer or heavier wire.
For inspiration on combining step lights with other features, projects featured on Instructables often show creative integration with decking and railings.
Design Ideas to Enhance Your Outdoor Stairs
Good design balances visibility, aesthetics, and restraint. Here’s how to get there:
Layered lighting works better than step lights alone. Combine riser-mounted step lights with outdoor wall lighting on adjacent walls or exterior spot lighting aimed at plantings. This creates depth and prevents the “runway” effect where steps float in darkness.
Indirect illumination often looks more polished than direct fixtures. Mounting lights under tread overhangs or behind risers casts a soft glow that guides without glaring. This approach works especially well with contemporary architecture and clean-lined materials like poured concrete or ipe decking.
Accent adjacent features. If your steps pass through a garden bed, add low-level path lights or uplighting on ornamental grasses. Outdoor spaces often benefit from ideas found in resources like Gardenista, where step lighting integrates with broader landscape schemes. If stairs lead to a covered porch, outdoor lighting sconces flanking the doorway provide additional wayfinding.
Color consistency matters more than most homeowners realize. Mixing 3000K and 5000K fixtures in the same sightline looks amateurish. Stick with one color temperature across all outdoor lighting for a cohesive appearance.
Minimize light pollution. Downward-facing fixtures (full-cutoff or shielded) reduce sky glow and keep lumens where they’re needed. If you live in a dark-sky community or near protected areas, this isn’t optional, it’s code.
Seasonal adjustments can extend your design. Dimming lights in summer when days are long saves energy, while brighter settings in winter improve safety on icy steps. Smart controllers make this effortless.
For homes in regions with strong design traditions, such as those featured in Southern Living, step lighting often ties into porch and entryway themes, think warm brass fixtures on painted risers or lantern-style lights that echo interior styling.
Material contrast adds interest. Brass or copper fixtures age beautifully on natural wood or stone. Matte black suits modern composites and metal stairs. Stainless steel is neutral and works with almost anything but can look sterile if overused.
Don’t forget maintenance access. Recessed lights in treads collect leaves and debris. Choose fixtures with removable trim rings or accessible housings so you can clean them without tools. Solar lights need occasional lens cleaning to maintain charge efficiency.
Eventually, the best design serves the space. A rustic cabin’s log steps don’t need the same treatment as a mid-century modern home’s floating concrete staircase. Let architecture lead, and let lighting enhance rather than dominate.