Outdoor luminaire lighting does more than just flip a switch when darkness falls, it shapes how people experience a home after sunset, adds layers of security, and highlights architectural details that daylight takes for granted. Whether it’s guiding guests safely to the front door or turning a backyard into an evening destination, the right fixtures make all the difference. Choosing luminaires isn’t about flooding the yard with light: it’s about placing the right fixture in the right spot with the right beam spread and color temperature. This guide walks through luminaire types, selection strategies, installation basics, and modern efficiency features to help homeowners plan outdoor lighting that’s both practical and polished.
Table of Contents
ToggleKey Takeaways
- Outdoor luminaire lighting serves three core functions—safety, security, and aesthetics—while requiring weatherproof fixtures with at least IP65 ratings to withstand exposure, moisture, and temperature swings.
- Select luminaire fixtures based on function: path lights for walkways, well lights and spotlights for accent landscaping, and wall sconces for entry and porch illumination, with style matched to your home’s architectural character.
- Low-voltage 12V or 24V systems are the most DIY-friendly for outdoor luminaire projects, requiring only a plug-in transformer, direct-burial cable, and basic tools, while avoiding electrical permits in most jurisdictions.
- LED luminaires reduce energy consumption by up to 85% compared to incandescent fixtures and last 50,000+ hours, with modern options featuring motion sensors, photocells, and smart controls for automated, efficient operation.
- Match fixture style and color temperature (2700K–3000K for warm residential ambiance, 3500K–4000K for modern or task lighting) to your home’s design language, and prioritize corrosion-resistant materials in coastal or harsh climates.
What Is Luminaire Outdoor Lighting and Why Does It Matter?
A luminaire is the technical term for a complete lighting unit, fixture housing, bulb socket, reflectors, lens, and any necessary wiring components, designed to produce, control, and distribute light. Outdoor luminaires are specifically engineered to handle weather exposure, UV degradation, moisture ingress, and temperature swings that would quickly destroy an indoor fixture.
Why does this matter for a DIY project? Because “weatherproof” means different things. Look for fixtures with an IP (Ingress Protection) rating of at least IP65 for most exposed locations. That rating means the unit is dust-tight and can handle low-pressure water jets from any direction, rain, sprinkler overspray, or hose washdowns won’t cause failure. For coastal areas or regions with harsh winters, IP66 or IP67 ratings offer extra protection.
Outdoor luminaires serve three core functions: safety (illuminating steps, walkways, and entry points to prevent trips and falls), security (deterring trespassing and lighting dark corners around the property), and aesthetics (highlighting plantings, architecture, and outdoor living areas). Many homeowners underestimate the security value, well-lit perimeters reduce break-in risk by making it harder to approach unnoticed. The key is balancing visibility with glare control: a poorly aimed floodlight can blind visitors and neighbors while leaving dark pockets untouched.
Modern luminaires also integrate with photocells and motion sensors, automating operation and reducing wasted runtime. Photocells switch fixtures on at dusk and off at dawn without manual intervention, while motion sensors activate lights only when needed, useful for side yards, garage approaches, or back patios that don’t need constant illumination.
Types of Outdoor Luminaire Fixtures for Every Space
Choosing the right luminaire starts with matching fixture type to function. Outdoor lighting isn’t one-size-fits-all, each fixture category handles different beam angles, mounting conditions, and design goals.
Path and Landscape Luminaires
Path lights are low-profile fixtures (typically 18–24 inches tall) that line walkways, driveways, and garden borders. They provide downward-focused light pools spaced every 6–8 feet to guide foot traffic without glare. Most use bollard or stake-mount designs: bollards offer more durability and wind resistance, while stake-mount versions install faster in soft soil.
For landscape lighting, well lights and bullet spotlights dominate. Well lights (also called in-ground or recessed uplights) sit flush with the ground and cast beams upward to highlight tree canopies, architectural columns, or tall shrubs. They require stable, well-drained locations, don’t install them where water pools or heavy foot traffic occurs. Uplighting techniques can dramatically change how mature trees and structural elements appear at night.
Bullet or directional spotlights mount on stakes or hardscape and offer adjustable aim. Use these for accent lighting on focal points, a specimen plant, water feature, or facade detail. Choose fixtures with adjustable beam spreads (narrow spot, medium flood, or wide flood) to match the target size. A 15-degree narrow beam highlights a single tree trunk, while a 60-degree flood washes a garden bed or low wall.
Low-voltage systems (12V or 24V) are the go-to for pathway and landscape projects because they’re safer to install (no electrical permit in most jurisdictions), easier to modify, and less risky if a cable gets nicked during future digging. A typical 12V system uses a plug-in transformer rated for 100–300 watts, with 12- or 14-gauge direct-burial cable running to fixtures. Voltage drop becomes an issue beyond 100 feet of cable run, calculate total wattage and wire length to stay within the transformer’s capacity, or plan multiple home runs from the transformer.
Wall-Mounted and Sconce Luminaires
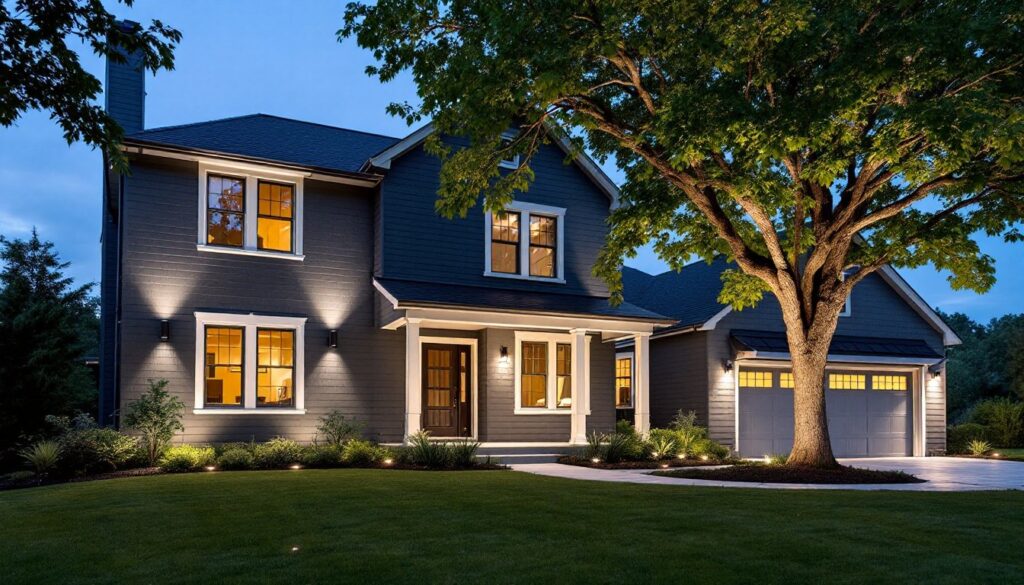
Wall sconces and lanterns handle entry lighting, porch illumination, and accent lighting on vertical surfaces. They mount to exterior walls, posts, or columns and direct light up, down, or both. For front entries, choose fixtures sized proportionally to the door, an 8-foot-tall entry with a 36-inch door needs sconces at least 15–20 inches tall, mounted 60–66 inches off the ground (roughly eye level) and spaced 8–10 feet apart if flanking a wide porch.
Downlights and flush-mount ceiling fixtures work well for covered porches, breezeways, and eaves where you need overhead illumination without a hanging fixture. Install these on a switched circuit or add a photocell for automatic operation. For damp-rated locations (covered but open to moisture), UL-rated fixtures are sufficient: for fully exposed soffits, use wet-rated versions.
Modern wall sconces now feature integrated LEDs and minimalist designs that complement contemporary architecture. When planning sconce placement, consider both light distribution and shadow effects, sconces with opaque backs and open tops/bottoms create dramatic up/down beams, while frosted or diffused glass versions spread light more evenly.
Gooseneck and barn lights are popular for farmhouse and industrial-style homes. They provide directed task lighting over doorways, garage entries, and outdoor workspaces. Most mount with a standard round or rectangular junction box: verify the box is securely fastened to a stud or blocking, not just siding, to support the fixture’s weight and wind load.
Choosing the Right Luminaire Style for Your Home’s Architecture
Matching fixture style to architectural character keeps outdoor lighting from looking like an afterthought. Start by identifying the home’s design language, traditional, modern, craftsman, colonial, farmhouse, or contemporary, and select luminaires that echo existing details.
Traditional and colonial homes pair well with lantern-style fixtures in black, bronze, or aged finishes. Look for beveled or seeded glass panels, decorative scrollwork, and proportions that mirror the home’s window muntin patterns. Southern and country-style homes often lean toward larger, more ornate fixtures that make a statement on wide porches and grand entries.
Modern and contemporary architecture demands clean lines, geometric forms, and minimal ornamentation. Choose fixtures with square or rectangular housings, brushed or powder-coated finishes (black, graphite, or stainless), and integrated LED strips rather than exposed bulbs. Many modern luminaires use indirect lighting, fixtures that cast light against walls or ceilings rather than projecting it outward, to create subtle, glare-free illumination.
Craftsman and bungalow homes work best with fixtures that reflect arts-and-crafts detailing: warm metal finishes (copper, oil-rubbed bronze), art glass or mica panels, and modest scale. Avoid oversized or overly ornate fixtures that compete with the home’s horizontal lines and natural material palette.
Color temperature matters as much as style. Outdoor luminaires typically range from 2700K (warm white) to 4000K (neutral white). Warmer temperatures (2700–3000K) flatter brick, wood, and stone facades and create inviting, residential ambiance. Cooler temperatures (3500–4000K) work for modern homes with white, gray, or metal cladding and provide crisper visibility for task lighting around garages and utility areas.
Don’t forget finish durability. Coastal and high-humidity regions demand corrosion-resistant materials, look for marine-grade aluminum, stainless steel, or powder-coated steel with added UV and salt-spray protection. Cheaper painted finishes will pit and flake within a few seasons of saltwater exposure.
Installation Tips for DIY Outdoor Luminaire Projects
Most DIY outdoor lighting falls into two categories: low-voltage landscape systems (12V or 24V) and line-voltage wall fixtures (120V). Both are manageable for homeowners with basic electrical skills, but each has specific safety and code requirements.
Low-voltage installation is the most DIY-friendly. Start by placing the transformer near a GFCI-protected outdoor outlet, most transformers plug in like an appliance. Run 14-gauge direct-burial cable (or 12-gauge for runs over 75 feet) along the planned fixture route, burying it 6–8 inches deep. Many codes don’t require conduit for low-voltage landscape wiring, but check local ordinances, some jurisdictions mandate shallow conduit or depth markers.
Stake or mount each fixture, connect wiring using waterproof wire nuts or twist-lock connectors (supplied with most low-voltage fixtures), and test before burying the cable. If fixtures seem dim or inconsistent at the far end of a run, you’re likely experiencing voltage drop, add a second transformer with a new home run, or upgrade to heavier gauge wire. A simple multimeter check at the last fixture should read within 10–10.5V for a 12V system: anything below 10V causes dimming and shortened LED life.
Line-voltage (120V) installation requires more caution. Always turn off power at the breaker before starting, and use a non-contact voltage tester to confirm wires are dead. If running new wiring from the house, use UF-B (underground feeder) cable suitable for direct burial, or run THWN wire inside PVC conduit. Most jurisdictions require GFCI protection for all outdoor receptacles and fixtures within reach of grade.
For wall-mounted sconces, locate the junction box during new construction or cut in a weather-resistant retrofit box on existing walls. Make sure the box is secured to solid blocking or a stud, not just siding. If the fixture weighs more than 5 pounds, code requires additional support, either a fan-rated box or separate mounting bracket.
When installing DIY landscape lighting systems, plan wire routes before digging. Mark sprinkler lines, utility locations (call 811 for free locates), and future planting areas to avoid conflicts. Use a flat-blade spade or edging tool to create a narrow trench rather than a wide ditch, it’s faster to close and less disruptive to turf.
Tool recommendations: For low-voltage work, a basic cordless drill, wire strippers, and voltage tester are sufficient. Line-voltage projects benefit from a fish tape (if running wire through walls), a reciprocating saw or drywall saw (for cutting in boxes), and a good headlamp for working in dim crawl spaces or attics.
Safety essentials: Always wear gloves and eye protection when cutting or drilling. If working overhead (installing soffit lights or eave fixtures), use a stable ladder with a standoff bracket to keep it away from siding and gutters. Never work on live circuits, even “just testing” something can result in shock or arc flash.
Energy Efficiency and Smart Features in Modern Outdoor Luminaires
LED technology has redefined outdoor lighting economics. Where a 60-watt incandescent path light once consumed 525 kWh per year (running dusk-to-dawn), an equivalent 8-watt LED uses just 70 kWh, an 85% reduction. Over a fixture’s 25,000–50,000-hour lifespan, that’s significant savings on both energy bills and bulb replacements. Most quality LED outdoor luminaires now offer L70 ratings of 50,000+ hours, meaning they’ll still produce 70% of their original output after roughly 11 years of nightly use.
Smart controls add another efficiency layer. Wi-Fi and Bluetooth-enabled luminaires integrate with home automation platforms (Alexa, Google Home, Apple HomeKit) for voice control, scheduling, and remote on/off. More advanced systems use astronomical timers that automatically adjust on/off times based on local sunset/sunrise data throughout the year, no manual seasonal reprogramming.
Motion sensing pairs well with LED efficiency. A fixture that only runs 10% of the night (triggered by motion) uses 90% less energy than one running continuously. Use motion sensors for utility areas, side gates, and secondary pathways that don’t need constant illumination. Set the sensor sensitivity and duration appropriately, a 1–3 minute timer is usually sufficient for walkways: 5–10 minutes works for patios or work zones.
Color-tunable LEDs are appearing in premium outdoor luminaires, allowing homeowners to shift from warm (2700K) to cool (4000K) white depending on the occasion, warm for entertaining, cooler for task work or security visibility. Some systems also offer RGB accent modes, though these are more novelty than necessity for most residential projects.
When shopping, look for luminaires with replaceable LED modules or drivers rather than fully integrated, non-serviceable units. A failed driver is a $15–$30 fix: replacing an entire integrated fixture costs $50–$200. Manufacturers like those specializing in modern exterior lighting increasingly offer modular designs that extend serviceable life.
Solar-powered luminaires continue to improve but still lag behind wired options in brightness and reliability. They’re best for supplemental accent lighting in areas where wiring is impractical, remote garden paths, fence posts, or seasonal displays. Expect 4–8 hours of runtime per charge in summer, less in winter. Replace rechargeable batteries every 2–3 years to maintain performance.
Finally, consider zoning outdoor lighting into separate circuits or transformer channels. This allows different areas (entry, driveway, backyard, landscape accents) to operate independently, either manually or on different schedules. A front entry might stay lit all night, while backyard landscape accents shut off at 11 p.m. Zoning also simplifies troubleshooting, if one zone fails, the rest keep working.
Outdoor luminaire lighting isn’t just about visibility, it’s about creating intentional layers of light that enhance safety, extend living spaces, and showcase a home’s best features after dark. With the right fixture selection, thoughtful placement, and modern efficiency features, any homeowner can tackle an outdoor lighting project that delivers both immediate impact and long-term value.